This is part of the How to Big Wall Climb SuperTopo book. Videos like the ones above illustrate key points of the book and are meant to be watched while reading the book. Buy the book here or just read this free sample of the text below with photos.
Visit on supertopo.com
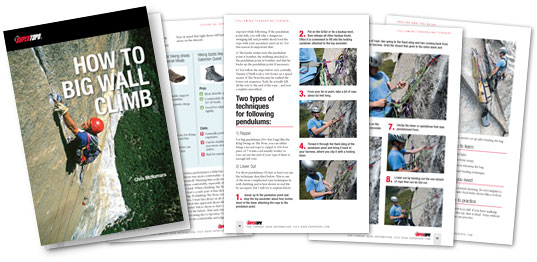
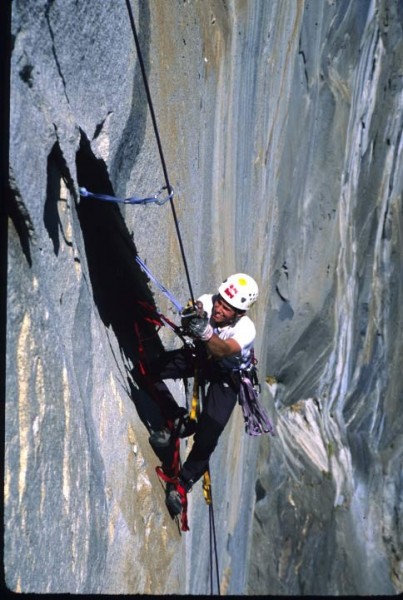 Chris McNamara jugging high on Zenyatta Mondatta, El Capitan. Long slings protect the rope from the sharp edge. Credit: Jason "Singer" Smith |
||
Anchor a free-hanging rope 20 to 30 feet up. Have the rope length be at least 200 feet.
Following: The Basics
The difference between efficient and inefficient Ascender technique or jugging is subtle but crucial. The wrong technique burns your arms and causes bad bicep and forearm cramps. On my first one-day ascent of The Nose I used such bad technique that my arms started locking up around the Great Roof with terrible cramps. I wasnt sure I would be able to finish the route. NOTE: For the rest of this book I use the term jug or jugging to describe ascending a fixed rope with mechanical Ascenders.
Skills to learn
Gear You Need
Where to Practice
The same place you used for basic leading in the previous is probably best place to learn to jug. I learned to jug on a free hanging rope hung from a tree. Dont do that! Like leading, the best place to learn to jug is on a 30 to 50-foot, 80-degree smooth wall. Eighty degrees is not only a common angle you find on big walls, it is also much much easier to learn on. If you start on overhanging terrain you will get more frustrated and develop more bad habits. If the 80-degree wall at your climbing gym has too many giant holds they will get in the way.
Tip: before you start, its a good idea to practice two techniques:
1- The motion of opening and closing the cam of the Ascender. Spend 10 or 15 minutes opening and closing the cam with your right and left hands. Then hang a piece of climbing rope in front of you and practice taking it on and off the rope for 10 to 15 minutes.
2 - Practice retracting the Ascender cams with your thumb to slide the Ascender up and down the rope without actually taking it off the rope.
Basic Ascender Setup
1. Attach the daisy chains to your harness.
2. Connect Aiders to locking biners.
3. Attach Ascenders to rope. If you are right-handed, the right Ascender goes on top.
4. Clip a daisy chain and Aider to the bottom Ascender (if you want extra peace of mind, use a locking biner. I dont but I probably should.)
5. Clip a biner attached to a daisy chain and Aider to the top Ascender.
6. Figure out the right length of daisy chain for the top Ascender and clip the daisy chain directly into the locking biner and lock the gate.
Key point: Get the top daisy length right. If the daisy connected to the top Ascender is too long, you will put too much weight on your arms. If too short, you will make ascending motions that are too short and inefficient. The way to know that you have the right length is when you hang with all your weight on the daisy chain, your arm comfortably holds the Ascender with a small bend. (TK Show three photos: good, daisy too short, daisy too long)
If you just have one daisy chain, use it to attach yourself to the top Ascender. Use two intertwined shoulder-length runners to connect to the bottom Ascender.
If you dont have any daisy chains, use one shoulder-length runner to attach yourself to the top Ascender. Use two intertwined shoulder-length runners to connect to the bottom Ascender.
Video: Ascender Set Up
Two Ascending Techniques, One Principle
The two ascending techniques depend on whether a) The wall is vertical or overhanging, or b) The wall is less than vertical. In either case, the most important thing is to keep as much weight as possible on your legs and as little weight on your arms. In this chapter we cover less than vertical terrain. In the next ascending chapter we cover vertical and overhanging terrain.
A. Less Than Vertical Wall (slabby wall)
1. With your feet out of the Aiders, pull the slack out of the rope by alternately sliding the Ascenders up the rope.
2. If you are right-handed (right Ascender on top) you put your left foot in the third step of an aid ladder or the second step of a standard Aider. Push the right Ascender as high as you can, then put your right foot in the fourth step of an aid ladder or the third step of a standard Aider. Note 1: If you are left-handed, reverse this. Note 2: If you are taller than six feet, you might need to put your feet lower.
3. Once you have pushed the top Ascender as high as it will go, shift your weight onto the Aider connect to the top Ascender. Ease your weight off the Aider connected to the bottom Ascender and slide up the Ascender.
4. Repeat. At first it is tricky to coordinate the weight shifting. But in a short time it will start to flow.
Key Tip
Two common frustrations when learning
Read the rest of this chapter in the How to Big Wall Climb SuperTopo book
Visit on supertopo.com