Click here to see what is currently on my El Capitan rack.
Building Big Wall Anchors
Overview
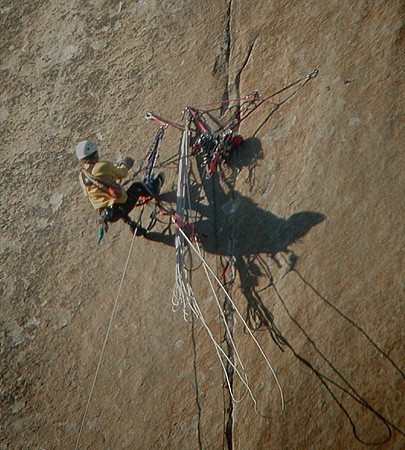
Building clean anchors is one of the easiest skills and yet probably 50 percent of the teams on El Cap never learn how. All too commonly wall climbers build anchors that end up like a rat's nest. Everything is clipped everywhere. It is hard to tell how well backed up things are, so even more backups are thrown in. In the end, you wind up with a modern art piece that is probably safe—but it is hard to tell since there are so many things clipped in so many places. Then it comes time to free up a rope and it becomes a form of surgery to delicately unclip and reclip things so that everyone stays safe. And where did all my free biners go?
There is another way.
Making clean anchors is actually pretty easy, fast and does not require as much gear as the clusterf*#k described above. The first step is to realize that big wall anchors are not the trad anchors you place on a typical multi-pitch climb. Usually, on a multi-pitch climb, you have one rope and one partner and not much else. In that situation it's okay to toss in a couple if pieces and equalize them. And then maybe tie in another piece with a clove hitch.
But on a wall, you just can't do that. Improvising seems more efficient at first but then it turns into a downward spiral as all the elements not present in trad climbs are added in. You have at least two ropes, a lot more gear, haul bags, and sometimes all this takes place at a hanging belay with no ledge to stand on. You need to plan out the anchor in advance. You can't improvise half way through or everything turns to spaghetti.
Skills to Learn
Gear You Need
Cordalette, free biners, shoulder-length slings, gear for the anchor, locking biners.
Where to Practice
You can practice anchors anywhere. Off a rafter in your house, a gym, at the crag. The key thing is to have three to five anchor points within a three-foot radius of each other.
The Magical Cordalette
This whole chapter probably could have been three words long: Use a cordalette. But I will elaborate a little. First off, make sure the cordalette is not a single continuous loop and instead is a single strand with two figure-eights on a bite at either end.
What makes the cordalette magical? It equalizes all the gear in the anchor to one bomber master point.
On a big wall belay I like to have three bomber bolts or at least four pieces of good gear. Most of the time there are four pieces of gear in the belay. The cordalette works best when all four pieces are near each other. If you have a piece or two that are off from the main anchor points, you might have to attach a shoulder-length sling to them and tie in the cordalette there.
The typical cordalette setup goes like this:
Everything revolves around the master point. Simple and bomber.
Note: It is good to get in the habit of always fixing the lead rope first, then getting ready to haul. That way, if it is windy or communication is unexpectedly difficult, the belayer will know that the lead line is fixed when the leader starts to haul.
When I Don’t Use a Cordalette
There are times, especially on The Nose, where I don’t use a cordalette. Usually, this happens when there are three bomber bolts in a row or two bolts in a row with one over to the side.
In this case, you certainly still could use a cordalette and that might be the best option. But I will often just use slings.
The Nine Knots You Need on a Big Wall
1. Figure-eight follow through —The only way to tie into the rope. Also a way to join two ropes for a big haul.
2. Figure-eight on a bite —The best knot for tying into the anchor.
3. Overhand knot —Good for fast applications where you are pretty sure the knot will not be loaded, like tying backup knots while jumaring. If you think you will load the knot, tie the figure eight on the bite because it is easier to untie later.
4. Double figure-eight —The most efficient way to equalize two pieces because it only requires two biners. This knot is best for trad climbs and is not commonly used on big walls. But it is a good one to know. It is especially good for fixing pitches because it helps you save biners and slings.
5. Clove hitch —The knot that uses the least about of rope to tie and is the easiest to tension. Great for bivvies or any application where you want to easily control the tension of the rope.
6. Overhand rappel knot —Great knot for rappelling. Leave at least 18 inches of tail and consider tying a backup knot.
7. Water knot —Used for tieing shoulder-length slings.
8. Girth hitch —Great for attaching two slings together to either improve an Aider or eliminate rope drag on a pitch.
9. Munter mule (covered in the hauling section)
Click here to see what is currently on my El Capitan rack.


