How To Big Wall Climb: Hauling and Bivy Gear
This is part of my How To Big Wall Climb project. View the table of contents here. You can read about basic aid gear here.
A Note About Links
The links go to our Price Finder where you can see if we have a review for that gear and then search for the best price. If you then buy something from that online retailer after clicking on one of those links, we get a little piece of the sale. If you are thinking about buying some of the gear mentioned in this article, we would appreciate it if you would click on one of the links before you buy. It won’t cost you anything extra, and it does help support this website. Thanks for keeping us in mind. Our affiliates are Altrec, EMS, Moosejaw, Mountain Gear, Mammoth Gear, Backcountry, Patagonia, and REI.
Chris Mac Pick
I add (Chris Mac Pick) after any gear that is currently my favorite. Click here to see what is currently on my El Capitan rack.
Gear Reviews
You can see all our big wall gear reviews here
Haul Rope
The ideal haul rope depends on what climb you are doing. If I am doing The Nose or Half Dome in just one bivvy and have a relatively light bag, I take a 8mm 60m static line. For most two to three-day walls I take a 9.5mm static line because the bags will be heavier and the line will take more abuse. For massive loads, I would take a 10mm static line. A 10mm static is a little heavy if you are free climbing, so I usually also have a 50 to 100-foot 6mm tag line. For the first 100 feet of the pitch I just trail the line. At 100 feet the 10mm static is attached. Then when I get to the belay I pull up the tag line to get to the 10mm static. This involves a lot more rope management, but it makes leading more pleasant and means you can pull up gear all the way until you are 150 feet out from the belay.
Some folks like the option of hauling with a lead line. That way, if the lead line gets damaged you have the haul line to use as a backup. This is a reasonable strategy. However, I find it is so much nicer to use a static, especially a thin static, that it is worth the trade off. Also, in 100-plus walls I have never damaged the lead line to the point I had to retreat. Usually, when I damage the rope it happens close to one end. So I then make sure to lead off the good end (using the tip above about having athletic tape).
Tag Line
A tag line is not always necessary. They are necessary on a route like The Nose that has giant pendulums (there sometimes is not enough lead rope left to be able to follow the pendulum). They are also necessary if you have a heavy haul line (see above) or you want to be able to pull up gear. I usually use 6mm to 7mm accessory cord in a length ranging from 50 to 100 feet.
Lower-out Line
There are three lower-out lines I use:
Cordalettes
Cordalettes are your number one defense against bad belay clusters. They are mandatory for any wall with natural anchors. I use to make my cordalettes by taking a 20-foot piece of 7 nylon cord and then tie a figure-eight at each end. In general, you can equalize four pieces with this. Today, I would just buy 20 feet of the Mammut Pro Cord (Chris Mac Pick).
A lighter option is to use 5.5mm Spectra or Dyneema cord. The downside with spectra is that it does not stretch as much as nylon. Therefore, on a massive fall onto the belay there will be more force transferred to the pieces with spectra than with nylon. The downside to nylon is that it is going to be a lot more bulky and is harder to untie after loaded. I generally go with spectra but you will need to decide what your own priorities are: weight and ease of use or ability to reduce shock loading if there is a fall onto the belay. Check out our climbing sling review to read about the difference between Spectra/Dyneema and nylon.
There are also some pre-made cordalettes like the Trango Equalizer and the Metolius Equalizer. I have never used them so i can't give much of a review. They appear to be easy to use and convenient. However, they are also more bulky and heavy than just buying some cord and making your own.
Hauling Devices
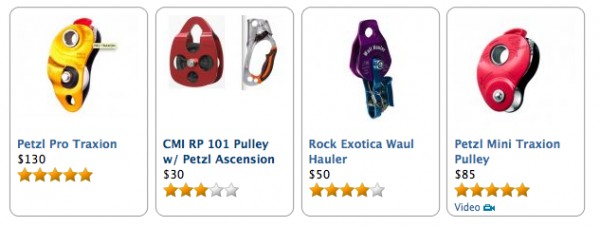
Hauling devices like the Petzl Pro Traxion (Chris Mac Pick) are great because they are simple and efficient, unlike the old-school hauling method with a pulley, two Ascenders, and extra weights and slings. In general, you want to have a pulley that is at least one inch in diameter. If my bag is really light, I will bring the Petzl Mini Traxion (Chris Mac Pick) because it is lighter weight. If you have really heavy loads, you will want to buy a three-inch diameter pulley and set up the old fashioned hauling method with Ascenders. Check our our complete Hauling Device Review and our Hauling Device Buying Advice.
Haul Bags
Check out our article Haul Bag Buying Advice where we explain what is important to look for when buying a haul bag.
And we have a complete review of haul bags here titled Haul Bag Review - The Best Bags for Big Wall Climbing
Portaledges
I really miss the old A5 ledges. They were light and simple to set up.
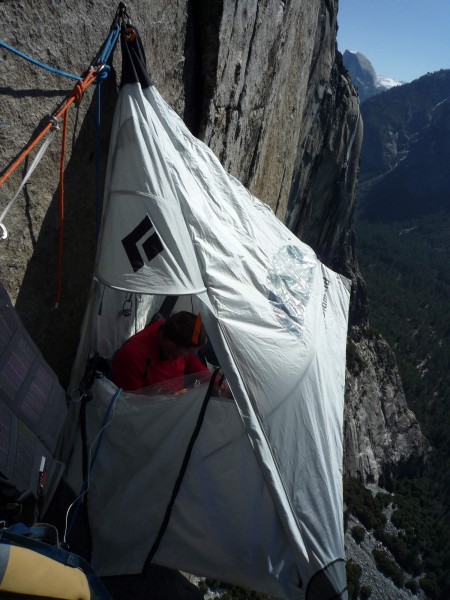
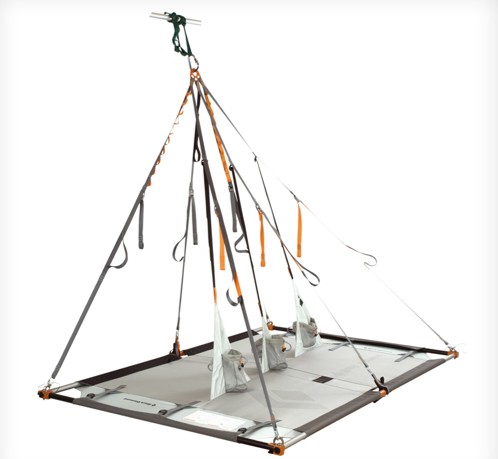
The current offerings of the Black Diamond Cliff Cabana and Metolius Bomb Shelter Portaledge (Chris Mac Pick) are both great ledges but they are HEAVY. I also find them much harder to set up than the old A5. I have a friend who had to delay his El Cap ascent by a few months when he tweaked his shoulder trying to get the spreader bar on (I won't name which brand it was; both spreader bars are equally cantankerous in my experience). Those gripes aside, once these ledges are set up they are deluxe. Very comfy, very bomber.
What I am excited about are the new rain-flys that are bomber. You can read a review of the BD one here. I have not used the Metolius but I hear it is great, too.
If you are not in a rush, consider a Fish portaledge. They are made to order and wait times can be one to two months or more, but these ledges have many happy users and are much lighter than the BD or Metolius ledges. They are also hundreds of dollars less. I have never used one so I can't give a review.
I don't mention single portaledges because I have only used one on maybe three of 100 big wall ascents and always wished I had a double. The reasons: it is much easier to set up a bivvy with just one double portaledge and there there used to be a giant overall weight savings to bringing one double ledge instead of two single ledges. However, that was when the widely available double ledges were only slightly heavier than the single ledges. Today, double ledges are so heavy that it is not that much extra weight to bring two lighter weight single ledges. It's a personal call. I still prefer just one double ledge because overall you will save weight and it makes the bivvy setup much easier. But soloists and people that really want their own personal space may prefer a single ledge.
Sleeping Pads
The best option by far is the Therm-a-Rest Ridge Rest SOLite (Chris Mac Pick). I get the small (48" size) which fits in any portaledge. For low angle routes, I line the haul bag with it. The Therm-a-Rest Ridge Rest Solar is a warmer and beefier version of this pad. But because it does not come in a small size and is much thicker, it is hard to fit two of these in a haulbag and everything else you need to haul. For an overhanging route, an inflatable pad like the Therm-a-Rest Prolite is nice because it is easy to pack. At a hanging belay, it can be really tricky to line the haul bag with your foam sleeping pad every morning. However, on most walls I climb, a sleeping pad is not really mandatory. And if you need to camp on top of the wall for a night, a rain fly or haul bag will work great to insulate you from the ground. View our complete Best Sleeping Pad Review to see how top pads compare.
Sleeping Bag
A synthetic sleeping bag is mandatory for walls: never use down. If you are in a storm, being in a portaledge is one of the most wet and soaking experiences you can have. There is a 90 percent-plus chance your bag will get wet, even if you have a bivy sack and a bomber rain fly over the portaledge. If you have a down bag, it will quickly turn to mush and make you even colder. I have always used the North Face Cats Meow (Chris Mac Pick) because it is relatively light and durable. I have had mine for 15 years. That said, if i was buying a new bag, I would get the Mountain Hardwear Ultralamina 15. It won our Editor Choice Award in our Best Sleeping Bag Review it has a unique half zip on either side. It is also just the warmest bag we tested. If you are on a budget, it is hard to go wrong with the Mountain Hardwear Pinole 20. It's only $80 and will get the job done.
Bivy Sack
A bivy sack is essential on a big wall if you think there is even a remote chance of being in a storm. Even if your rain fly is completely bomber and keeps all the outside weather out (and that is a big if), you are still likely to get wet from the moisture that condenses on the inside of the rain fly. If your rain fly is not bomber, then water will pool on the bed of your portaledge and make you even more wet. If you are climbing a wall without a portaledge, a bivy sack is even more important as it will likely be your only way to to stay dry (unless you also bring a rain fly). My favorite bivy sack is the Black Diamond Big Wall Bivy because it has a way to tie into a rope without having to untie.
Poop Tube
I go with the Metolius Waste Case (Chris Mac Pick) because it is simple and easy to use. However, there are many options out there, especially if you have time to make one yourself. There is guide to poop tubes in Chapter 15.
Stoves
I never used to bring a stove on walls. I liked to keep things fast and light and didn't mind eating cold Spaghetti-O's and a Starbuck's Double Shot for my coffee fix. But that was when I was a teenager. Today, I like a cup of hot coffee in the morning and maybe some heated Tasty Bites or noodles for dinner. The best stove option I have found is the JetBoil Flash (Chris Mac Pick) combined with the JetBoil Hanging Kit. This set up is very light and ideal for boiling water. You can get buy without the Hanging Kit, but it is much more nerve racking because there is no easy way to clip your stove in. Also, the hanging kit frees up valuable real estate on the portaledge.
For making coffee, I use the Melitta Ready Set Joe Coffee Cone because it is easy to clean and makes a great and consistent cup of coffee, especially if your parter brings really finely ground coffee (which goes right through metal filters and french press attachments).
Outerwear
A lightweight rain jacket like the Patagonia Torrentshell Jacket - Men's (Chris Mac Pick) is essential for all times of year. In the winter, fall or spring, you may want a burlier rain shell. Might as well also throw in a pair of rain pants. I have never used them to keep water off me but they often come in handy when it's cold on the wall. Most big walls are exposed to high winds and shell pants go a long way to keeping you warm.
A synthetic belay jacket is almost always essential on a wall (as you probably get by now, down is almost always a bad idea on a wall). In the summer, I go with a lightweight insulated jacket like the Patagonia Nano Puff Hoody - Men's (Chris Mac Pick). In colder times, I take a heavier synthetic jacket like the Patagonia DAS Parka - Men's.
I am not super picky about what fleece jacket I bring. I usually wear the Patagonia R2 Jacket - Men's just because it is lighter and easy to climb in that a heavy duty fleece.
Headlamp-Review-Review-Review-Review-Review
A good Headlamp-Review-Review-Review-Review-Review is essential. Even if you don't plan to climb at night, you almost always end up setting up a bivy at night. I like the Petzl Tikka XP 2 (Chris's Mac Pick) because it has a nice balance of being light and powerful. I also bring a Petzl E+Lite as a backup because it is so light it can always live in my belay jacket so I don't have to dig for it late at night. It is essential to bring spare batteries. If you planning to do a lot of night climbing, I would go with the much burlier and brighter Princeton Tec Apex Pro. It is the best Headlamp-Review-Review-Review-Review-Review for tricky route finding late at night.
Hydration Systems and Water Bottles
I like climbing with the Camelback Classic Pack on speed ascents because it is light and holds a few candy bars and a light rain shell. If you can find an even lighter hydration pack, go with that. However, if I am just swapping leads and not spending much time on lead, I will either not bring a hydration pack or will just bring a little 1 liter bottle.
I never duct tape water bottles. It's a waste!!! I have never broken a bottle on the wall. Instead, buy 2mm accessory cord, cut a 10-inch loop (made from a 22-inch piece), and girth hitch the top of your plastic water container. The easiest bottle to girth hitch are two-liter soda bottles. However, most water comes in gallon bottles that are harder to girth hitch. In this case, I might use a little duct tape at the top just to keep the string from sliding off. In a worst case scenario, you are allowed to use some extra pieces of duct tape to cover the bottle... but please please don't cover every square inch (as I all too often see on the wall).
Stuff Sacks
Stuff sacks with clip-in loops are awesome. The best ones are the Metolius Big Wall Stuff Sack (Chris Mac Pick) that come with two big and beefy clip-in points. The bag is beefy enough to be used as a rope bag or hung under the haul bag to haul. The alternative to this bag (just using a normal stuff sack on a wall) is not fun. You have to tie extra knots in your stuff sack draw cord and even then it can be a little nerve racking to hang valuable items off a little piece of drawstring.
Trekking Poles
I never even considered using trekking poles until a leg injury this year. I bought a pair and found they were well worth it. They are great for hiking big loads up to the base of El Cap. If you are doing an overhanging multi-day route, I would consider bring them if you have any leg or knee issues. You can clip them under the haul bag and use them for the descent. My favorite are the Black Diamond Trail Compact Trekking Poles because they collapse the smallest of any pole I know of, are light, and not that expensive.
Misc. Essential Wall Stuff
• Athletic tape like Metolius Climbing Tape. Mandatory to fix minor rope dings.
• Bandana. (Yosemite Style!!)
• Duct tape. Just the end of a roll, about three feet. You can wrap a strip around a water bottle, not to jacket the bottle (a needless project) but as a way to carry some tape. Among the uses of duct tape: protect sharp edges, cover holes that form in a haul bag.
• Wet One's Wipes.
• Lightweight Shell Jacket and pants.
• Small Knife.
See what is currently on Chris McNamara's El Capitan rack.
Next Chapter: 14. Hauling, Managing the Belay, The Changeover
Take Me back to the Table of Contents
