| Route Name |
Formation |
Climbing Area |
|
|
Review |
|
|
Cookie Sheet |
Yosemite Valley, California USA |
3 |
5.8 |
|
|
|
Mecca |
Yosemite Valley, California USA |
3 |
5.12b |
|
|
|
Cookie Sheet |
Yosemite Valley, California USA |
3 |
5.8 |
|
|
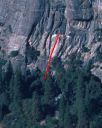
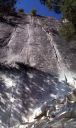
| Red Bud
5.9, Cookie Sheet
Photo:Chris Van Leuven |
|
Cookie Sheet |
Yosemite Valley, California USA |
3 |
5.9 |
|
|
| Eye Noir
5.9, Cookie Sheet
Photo:Chris Van Leuven |
|
Cookie Sheet |
Yosemite Valley, California USA |
3 |
5.9 |
|
|
|
Cookie Sheet |
Yosemite Valley, California USA |
3 |
5.8 |
|
|
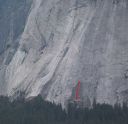
| Peasant
5.11a, Mecca
Mecca Overview
Photo:Chris McNamara |
|
Mecca |
Yosemite Valley, California USA |
3 |
5.11a |
|
|
| Pilgrimage
5.11b, Mecca
Mecca Overview
Photo:Chris McNamara |
|
Mecca |
Yosemite Valley, California USA |
3 |
5.11b |
|
|
|
Mecca |
Yosemite Valley, California USA |
3 |
5.11a |
|
|
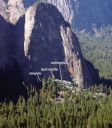
| Lost Arrow Spire Tip
5.12b or 5.7 C2, Lost Arrow Spire
One of the most spectacular summits in Yosemite.
Photo:Corey Rich |
|
Lost Arrow Spire |
Yosemite Valley, California USA |
2 |
5.12b or 5.7 C2 |
|
|
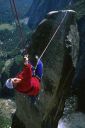
| Bishop's Terrace
5.8, Church Bowl
Church Bowl has on of the easiest approaches in the valley.
Photo:Chris McNamara |
|
Church Bowl |
Yosemite Valley, California USA |
2 |
5.8 |
|
|
|
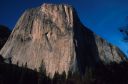
El Capitan |
Yosemite Valley, California USA |
2 |
A1 or C2+ |
|
|
| Harry Daley
5.8, Glacier Point Apron
Photo:Chris McNamara |
|
Glacier Point Apron |
Yosemite Valley, California USA |
2 |
5.8 |
|
|
| Salathe Base
5.10c, El Capitan
The base routes are scattered to the left of the SE Buttress.
Photo:Chris McNamara |
|
El Capitan |
Yosemite Valley, California USA |
2 |
5.10c |
|
|
| Jamcrack
5.9, Sunnyside Bench
Jamcrack is the line in the right.
Photo:Chris McNamara |
|
Sunnyside Bench |
Yosemite Valley, California USA |
2 |
5.9 |
|
|
|

