| Route Name |
Formation |
Climbing Area |
|
|
Review  |
|
|
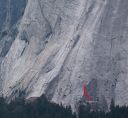
Pat and Jack Pinnacle |
Yosemite Valley, California USA |
2 |
5.8 |
|
|
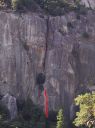
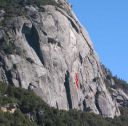
| Church Bowl Tree
5.10b, Church Bowl
Church Bowl has on of the easiest approaches in the valley.
Photo:Chris McNamara |
|
Church Bowl |
Yosemite Valley, California USA |
1 |
5.10b |
|
|
|
The Cookie Cliff |
Yosemite Valley, California USA |
2 |
5.9 |
|
|
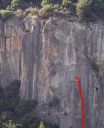
| Catchy
5.10d, The Cookie Cliff
Photo:Todd Snyder |
|
The Cookie Cliff |
Yosemite Valley, California USA |
1 |
5.10d |
|
|
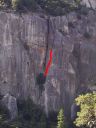
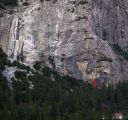
| Lena's Lieback
5.9, Swan Slab
Looking up at the route from the base.
Photo:Chris McNamara |
|
Swan Slab |
Yosemite Valley, California USA |
3 |
5.9 |
|
|
|
Five and Dime Cliff |
Yosemite Valley, California USA |
1 |
5.8 |
|
|
|
Reed's Pinnacle |
Yosemite Valley, California USA |
1 |
5.8 |
|
|
|
The Cookie Cliff |
Yosemite Valley, California USA |
1 |
5.11a |
|
|
|
El Capitan |
Yosemite Valley, California USA |
1 |
5.8 |
|
|
|
Camp 4 Wall |
Yosemite Valley, California USA |
2 |
5.9 |
|
|
|
Glacier Point Apron |
Yosemite Valley, California USA |
1 |
5.8 |
|
|
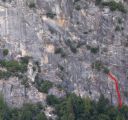
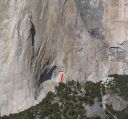
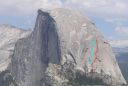
| Blondike
5.11b R, Half Dome
Blondike is the red line and Two Hoofers is the Blue Line.
Photo:Chris McNamara |
|
Half Dome |
Yosemite Valley, California USA |
7 |
5.11b R |
|
|
|
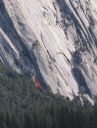
Five and Dime Cliff |
Yosemite Valley, California USA |
1 |
5.10a |
|
|
|
Schultz's Ridge |
Yosemite Valley, California USA |
1 |
5.10c |
|
|
|
Royal Arches Area |
Yosemite Valley, California USA |
1 |
5.8 |
|
|
|


